
Custom Natapp Automation Tool: Say Goodbye to Manual Configuration Hassles
Custom Natapp Automation Tool: Say Goodbye to Manual Configuration Hassles
Recently, my project required frequent use of intranet penetration, and every time I used Natapp, I had to repeat the same process: log in to account → purchase free tunnel → copy token → configure client → start service. It got really annoying after doing it many times, so I spent a weekend writing an automation script.
Now I only need one command to handle all operations, and I even created a nice-looking terminal interface for it. I’m sharing the implementation process - it might be helpful for friends with similar needs.
Features
This tool mainly implements the following functions:
- Auto Login - No need to manually enter account and password every time
- Auto Purchase Tunnel - Automatically apply for free tunnels and get tokens
- Smart Port Management - Support command-line port specification, automatically modify existing tunnel configurations
- Visual Interface - Created a nice terminal interface using Rich library
- Real-time Monitoring - Display system status and tunnel information
- One-click Startup - Complete the entire process with one command
Usage Effect
What originally took 3-5 minutes of manual operations is now completed automatically in 10 seconds. The interface also looks much more professional than the original black window.
Effect Demo
Compared to the native command-line tool, this interface indeed looks more intuitive, clearly showing tunnel status, system information, etc.
Implementation Approach
Project Structure
1 | nat_app/ |
Core Modules
- auto_natapp.py - Handles website automation operations including login, tunnel purchase, token extraction, etc.
- full_auto_natapp.py - Main program entry, handles UI display and user interaction
- natapp client - Official tunnel client program
- config.ini - Auto-generated natapp configuration file
Technical Implementation
Auto Login Module
I hit a small snag with login - natapp’s form field uses login instead of the common username, which caused login failures initially:
1 | def login(self, username: str, password: str) -> bool: |
Key Tip
Natapp’s login form uses the login field instead of the common username field, which is why many automation scripts fail.
Auto Purchase Tunnel
The tunnel purchase part is relatively complex, requiring form submission and CSRF validation. The core idea is to simulate browser operations:
1 | def buy_free_tunnel(self, local_port: int = DEFAULT_PORT, tunnel_name: str = DEFAULT_TUNNEL_NAME) -> Optional[str]: |
Smart Port Management
Port management is one of the features I’m quite satisfied with - you can directly modify existing tunnel ports through command-line parameters:
1 | def edit_tunnel_port(self, tunnel_id: str, new_port: int) -> bool: |
Terminal Interface Optimization
Since I was already doing automation, the interface couldn’t be too shabby. I used the Rich library to create a decent-looking terminal interface:
Brand Title Design
1 | def main(port=None): |
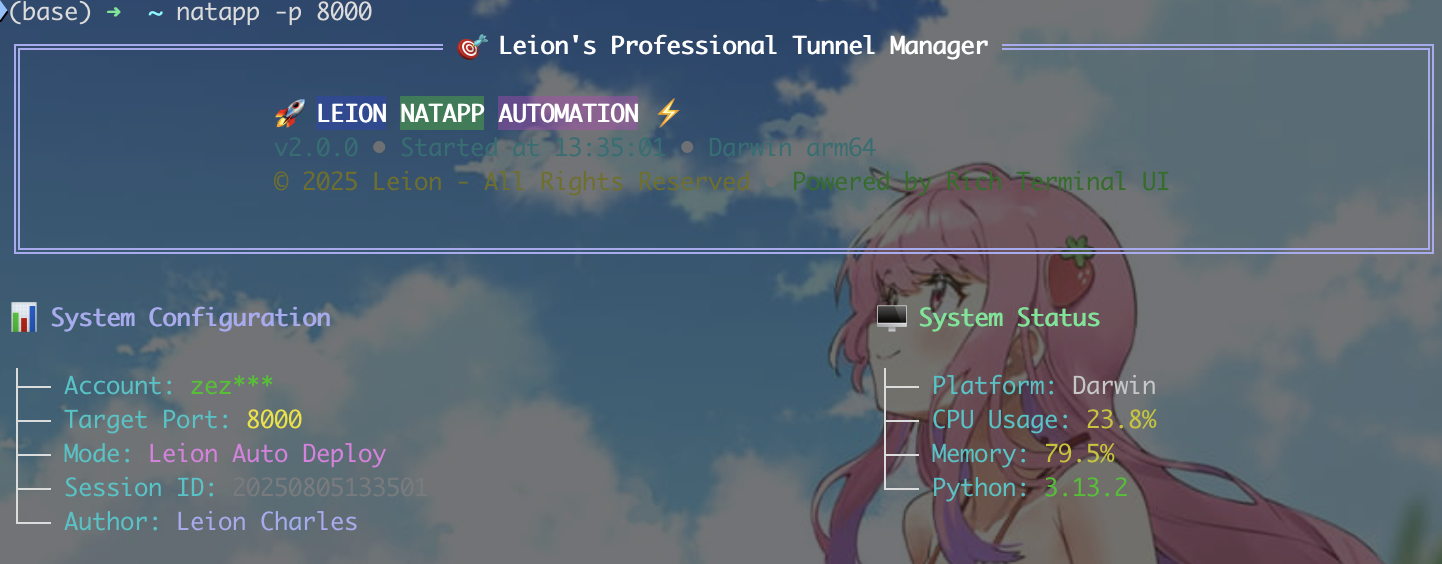
System Information Display
1 | # Get system information |
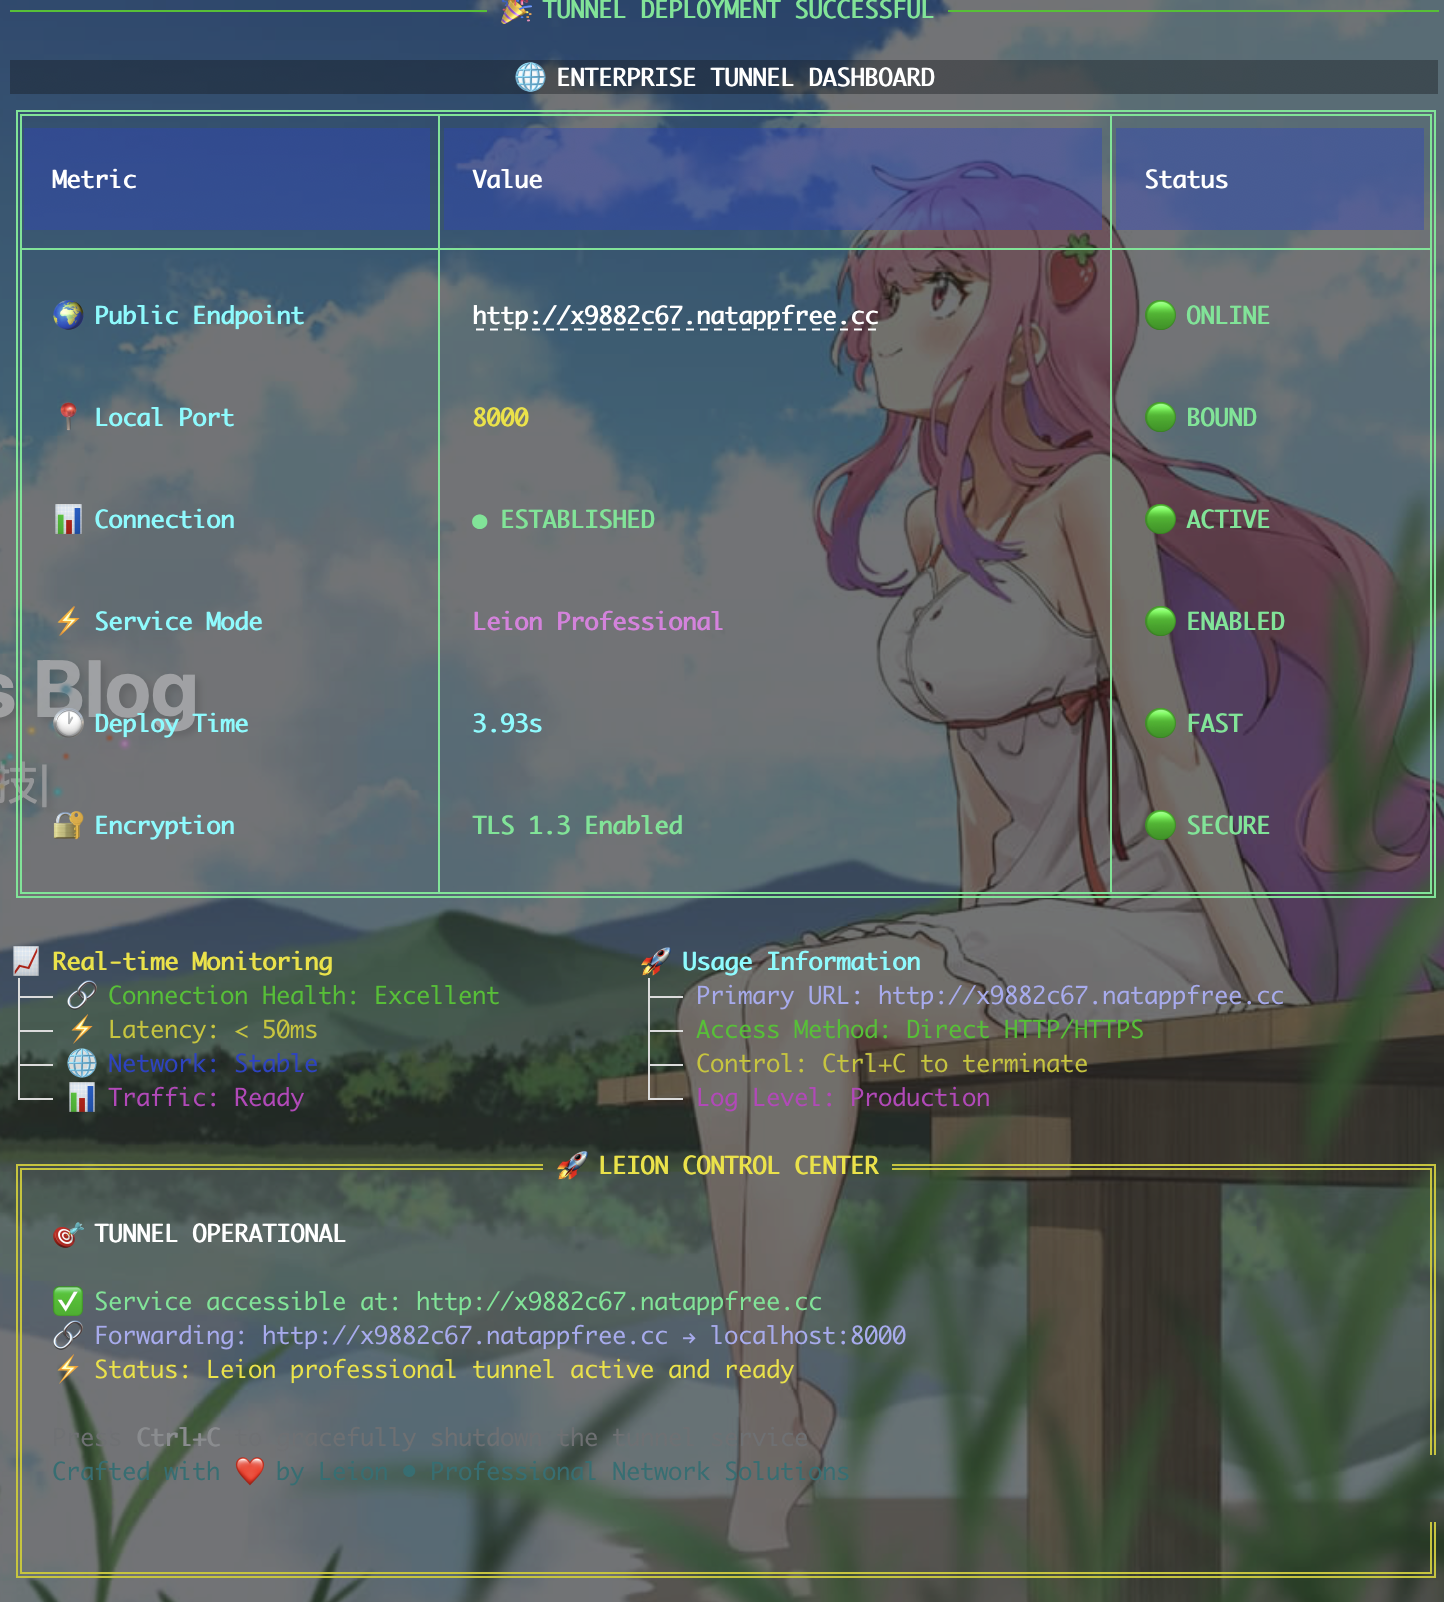
Tunnel Status Panel
1 | # Advanced tunnel status dashboard |
Configuration System
To make it easy for others to use, I put all personal information that needs modification at the beginning of the file:
1 | # ========================================== |
Configuration File Generation
1 | def update_config(self, authtoken: str, local_port: int = DEFAULT_PORT) -> bool: |
Usage Instructions
Environment Setup
- Environment Preparation
1 | # Install dependencies |
- Configure Personal Information
1 | # Modify configuration at the beginning of auto_natapp.py and full_auto_natapp.py |
- Set Global Alias
1 | # Add to ~/.zshrc |
Specific Usage
1 | # Basic usage (automatically determines whether to use existing tunnel or buy new one) |
Technical Details
Main Technologies Used
- Python 3.13+ - Language foundation
- Rich library - Terminal interface beautification, this library is really useful
- Requests - HTTP requests, essential for web scraping
- Psutil - System monitoring information acquisition
- Regular Expressions - Extract data from HTML
- Subprocess - Call natapp client
Some Problems Solved
CSRF Token Handling
- This took quite some time to debug, natapp’s token extraction has several formats
- Wrote multiple regular expressions to adapt to different pages
- Added retry mechanism to prevent occasional failures
Form Analysis
- Form field names vary across pages, need dynamic identification
- Login page uses
loginfield instead ofusername, this trapped me for a long time - Added various error detection and recovery logic
Real-time Monitoring
- Use psutil to get system resource usage
- Monitor tunnel connection status
- Display various metrics in real-time on the interface
Interface Design
- Rich library’s layout system is quite powerful
- Took a long time to match colors and styles until satisfied
- Added dynamic progress bars and status indicators
Error Handling
1 | # Multiple verification for successful login |
Performance Optimization
Startup Speed Optimization
- Parallel Progress Bars - Multiple tasks execute simultaneously
- Smart Caching - Reduce duplicate requests
- Quick Response - Optimize UI rendering
Connection Stability
- Session Reuse - Maintain connection state
- Auto Reconnection - Network exception recovery
- Timeout Control - Avoid long waits
Effect Comparison
Feature Comparison
| Feature | Manual Operation | Automation Tool |
|---|---|---|
| Account Login | Need to open browser and manually input | ✅ Fully automatic |
| Purchase Tunnel | Need to fill form and submit | ✅ Fully automatic |
| Configure Client | Need to copy token and manually configure | ✅ Fully automatic |
| Port Modification | Need to visit webpage and manually modify | ✅ One-click command line modification |
| Status Monitoring | Cannot view intuitively | ✅ Real-time dashboard |
User Experience
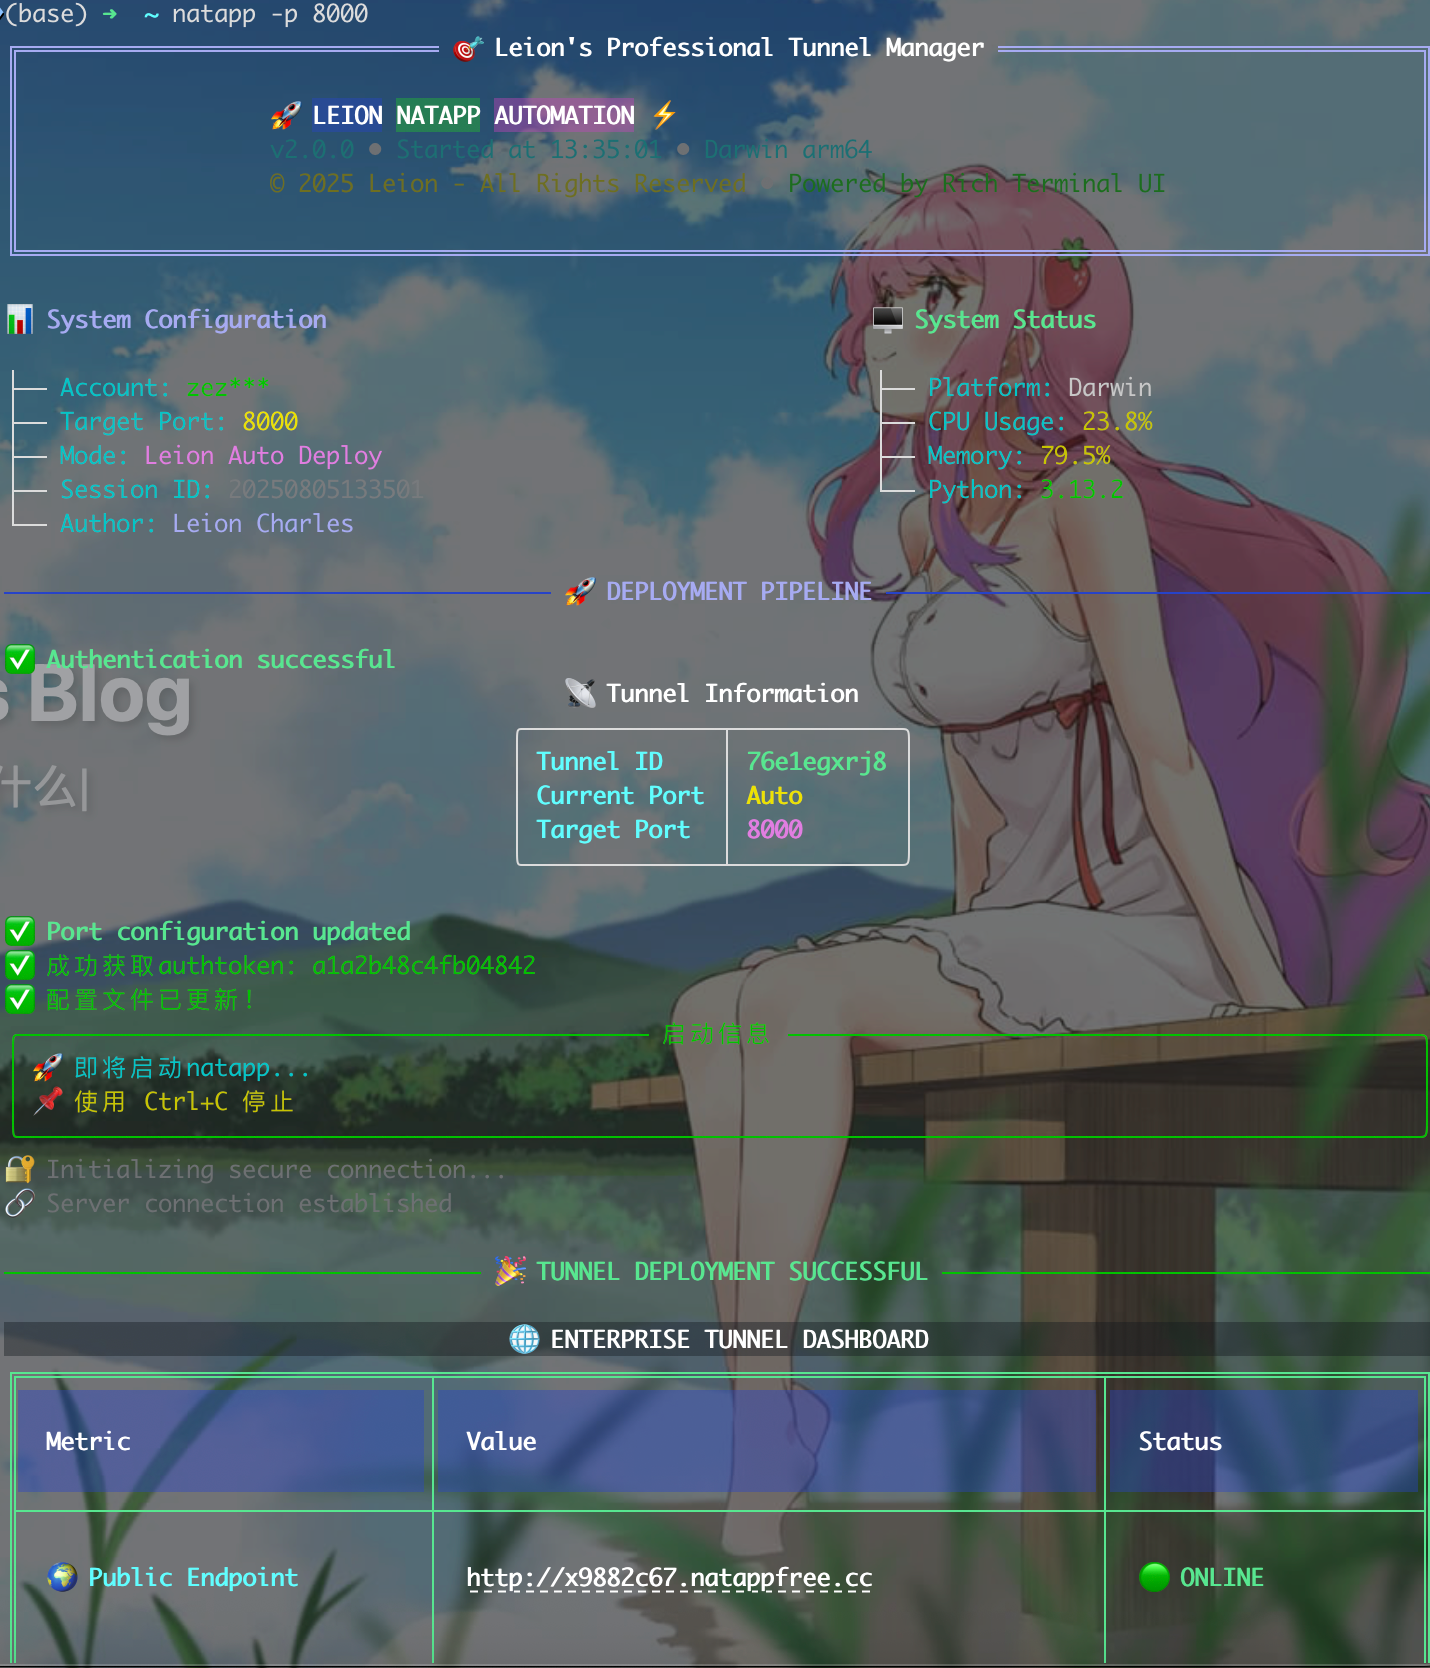
[Image Description: Please capture the complete usage process from startup to successful tunnel establishment]
- Startup Interface - Gorgeous brand title and system information
- Execution Process - Clear progress indication and status feedback
- Success Interface - Detailed tunnel information and monitoring data
- Control Panel - Professional operation guidance and status display
Future Plans
Feature Extensions
- Multi-account Management - Support switching between different accounts
- Tunnel Templates - Preset common configurations
- Batch Deployment - Manage multiple tunnels simultaneously
- Web Interface - Provide web-based management panel
- API Interface - Support third-party integration
Interface Improvements
- Theme Switching - Support multiple color themes
- Animation Effects - Add more visual animations
- Custom Layout - Users can adjust interface layout
- Multi-language Support - Internationalized interface
Summary
I wrote this tool simply because I was lazy - repeating that same process every time I used Natapp was too annoying. Originally wanted to write a quick script to make do, but got more and more excited as I wrote, and ended up with this.
Main Gains
- Automation - Completely freed my hands, 10 seconds to complete what used to take 3-5 minutes
- Interface - Rich library is indeed useful, the result is much better than expected
- Stability - Considered all kinds of edge cases, basically won’t fail
- Practicality - Use it every day, indeed improved efficiency significantly
Technical Insights
- Web automation is more complex than imagined, need to handle various tokens and form validations properly
- Terminal UI design is also an art, user experience is very important
- Error handling and edge case processing took up a large portion of the work
- Code organization and configuration management are crucial for later maintenance
Overall, although this small tool isn’t functionally complex, it was made with care. If you also frequently use Natapp, might as well try this automation tool - it should save quite some time.
Related Resources
The project code is all local, haven’t uploaded to GitHub yet. Could consider open-sourcing it if needed.
Usage Suggestion
This tool is mainly for improving development efficiency. If you also have similar repetitive operation needs, consider writing an automation script. The Python + Rich combination is indeed quite useful.
I wrote this article mainly to record the development process and share it with friends who might find it useful. The code isn’t complex, but it indeed solves real problems, and that’s enough.